- Local user—The account is created and validated within Kubex. For on-premise deployments, you can configure a local account linked to a Windows® Active Directory™ account to access Kubex. Windows® Active Directory™ is not supported for SaaS deployments.
- External authentication—These users are authenticated through an external identity provider, that support the OpenID Connect specification. Only the following external identity providers are supported:
|
Prerequisites
Identity Provider Requirements
Before you can configure the feature in Kubex, you must register Kubex with your identity provider. You need to provide information about the application type, login/logout URLs etc. This is a standard procedure across all applications using OpenID for authentication. Kubex supports: Google OpenID, Microsoft Entra ID, Okta and Ping as external identity providers.Table: Configuring Kubex with the Identity Provider
Table: Configuring Kubex with the Identity Provider
Setting | Description |
Application Type | Select Single Page Application (SPA) with Implicit grant type enabled. You must also allow ID Token and Access Token. If the ID Token or Access Token options are not available, please consult your Identity Provider’s administrator to determine where these are specified, or if they are implicitly set as a part of registering an SPA application with Implicit grant type. |
Login redirect URIs: | This is the callback URL to your Kubex instance where the identity provider redirects the user after they have been authenticated. https://<instancename>.kubex.ai:443 The HTTP redirect URIs must be protected with TLS security, so the service will only redirect to URIs beginning with “https”. This prevents tokens from being intercepted during the authorization process. |
Logout redirect URIs: | A logout URL is a URL in your Kubex instance that the identity provider can return to after the user has been logged out of the authorization server.
When using Google OpenID Connect only the following is required:
|
Required Scopes |
|
Kubex User Configuration
The user’s login ID returned from the identity provider must be in the form of an email address, and this email address must correspond to the email address in the Kubex user ’s profile.Authentication Code Workflow
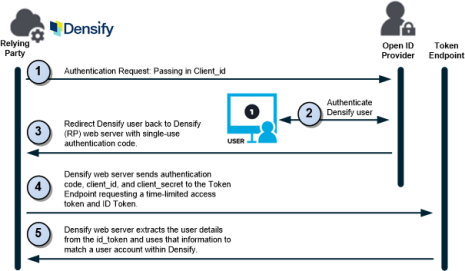
When this option is enabled, rather than transmit the user details, the identity provider sends a special, one-time-use authentication code that can be exchanged for an access token. This exchange includes the client_id and client_secret in addition to the authentication code. The Kubex user, attempting to access Kubex is still redirected to their identity provider’s login screen where they enter their credentials. The user must be registered with the identity provider and must have valid credentials to access Kubex. Upon successful login, Kubex validates the user using the ID token returned by the identity provider, as defined by the OpenID Connect specification. Additionally, the identity provider returns an authorization code to the browser. The Kubex web server now uses the supplied authorization code to request an access token. The identity provider validates the authorization code and sends the access token. Validation is completed by Kubex when a user profile with an email address that matches the user’s email address is located in the Kubex database.Figure: Authentication Code Workflow
Figure: Authentication Code Workflow
Configuring Authentication Code
- You must first register Kubex with your identity provider. This is a standard procedure across all applications using OpenID for authentication. See Configuring External User Authentication, above
- You now need to provide the following information to Kubex. These settings are all configured for you by Kubex. Contact support@kubex.ai for details.
|
|